


The Replay function in Super Smash Bros Ultimate on the Nintendo Switch is one of the best features in the entire game. It allows players to keep the best moments in their matches for posterity. However, some players have wondered how to access their replays and highlights. As such, this guide will focus on the method of obtaining Super Smash Bros Ultimate Replays. Although we briefly covered this previously, we’ll go into the specific technical aspects.
To preface this guide, it should be mentioned that the player must have an SD Card on their Nintendo Switch. Furthermore, the preferred amount of space is 128GB as replays can take some space in and of themselves. For the best results, a Class 10 Micro SD Card will help you with loading times and saving purposes.
How to record Replays in Super Smash Bros Ultimate?
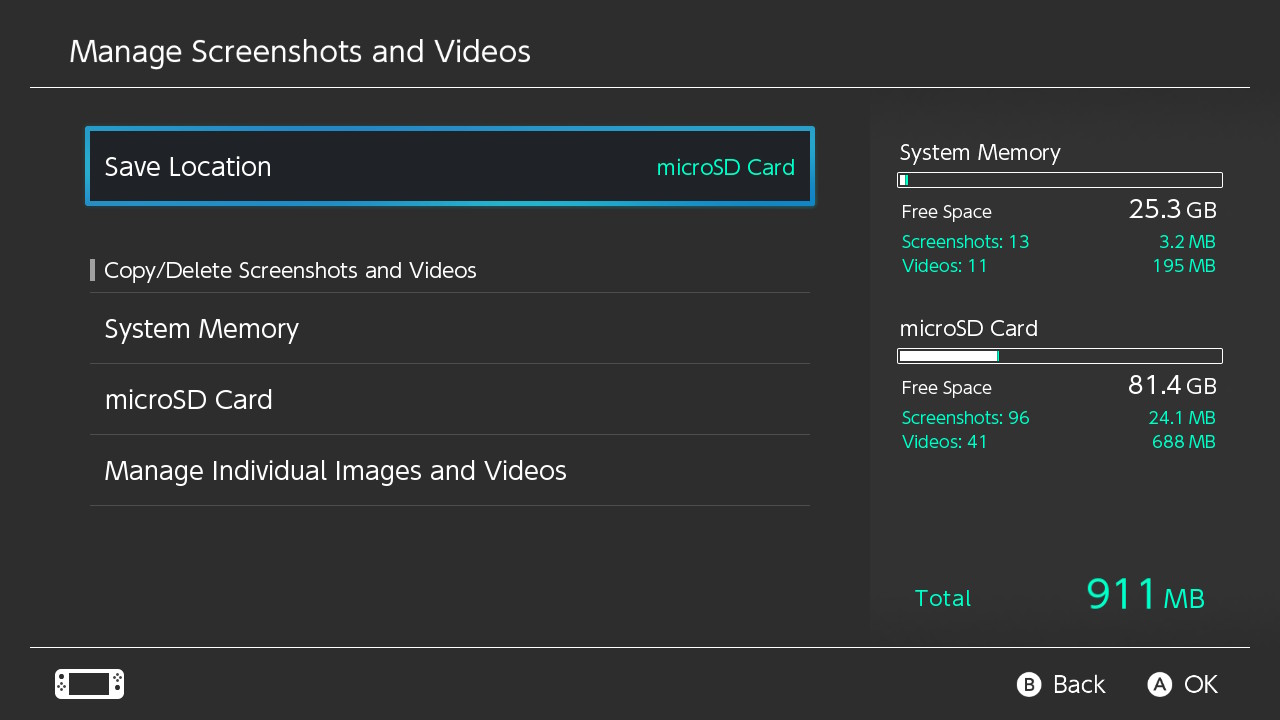
We should start by setting the Micro SD card as the default Save Location on the Nintendo Switch. This is done by going into the System Settings and then into Memory Management. Once there, set the default Save Location from System Memory to Micro SD Card as shown below:
Once done, open Super Smash Bros Ultimate from the HOME menu in the Nintendo Switch. After this, go to the Vault Section and select Replays. You’ll be able to see a menu with all the replays you’ve collected so far. Select your preferred replay to record and you’ll be able to see an option to Convert to Video.

You’ll be faced with a screen that allows you to select the Quality and Sound options. As you can see, you can turn the music and sound effects off. Not only that, but you’ll also be able to remove the information display. This means that replays can come without any % index or portraits for the characters at the bottom of the screen.
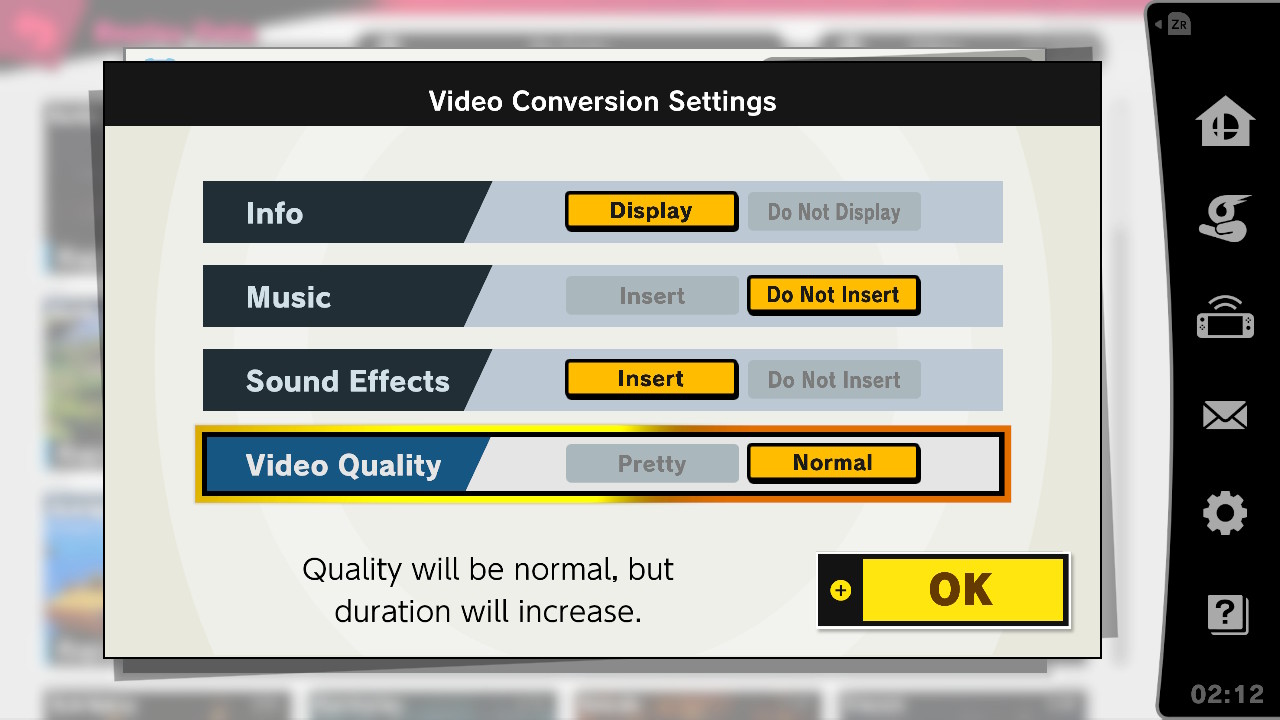
Also note that any replays you save in Super Smash Bros Ultimate will not record the “3, 2, 1, GO!” count. The replay will always start recording from the point the match itself starts. In addition, you’ll be able to record different segments in the replay by pressing the A button during the recording.
What’s the difference between “Pretty” and “Normal”?
There are 2 rendering qualities, “Pretty” and “Normal”. The Pretty quality outputs additional visual effects; However, it can also have incredible framedrops throughout the replay. The Normal quality offers the best performance without much visual pizazz. It’s up to you to decide which video quality best suits your replays.
https://www.youtube.com/watch?v=qNq244AuLqI
Let’s make clear that the game will render replays at 720p and will try to stay at 60 FPS. However, in some occasions, the frame rate will have some dips. Furthermore, stages like Fountain of Dreams can actually make the performance of the rendering suffer a bit.
After you record your Replay, Super Smash Bros Ultimate will store the video file in your SD Card. Now that we’ve got the replays, it’s time to access them.
How to Access Super Smash Bros Ultimate Replays?
Once you’ve recorded your favorite Replays; you may want to get them for viewing on your PC. To do this, shut down Super Smash Bros Ultimate and Turn off the system completely. This is done by pressing and holding down the POWER button until a menu shows up. In it, you’ll be able to completely turn off the console.
After you completely turned off the Nintendo Switch console. You’ll have to remove your MicroSD card from the console. DO NOT turn the Nintendo Switch console back on; this can lead to fatal errors and damage your console.
Once you’ve removed your MicroSD Card from the console. You can use a MicroSD adapter to read your MicroSD card in your PC. You’ll see a folder like this:
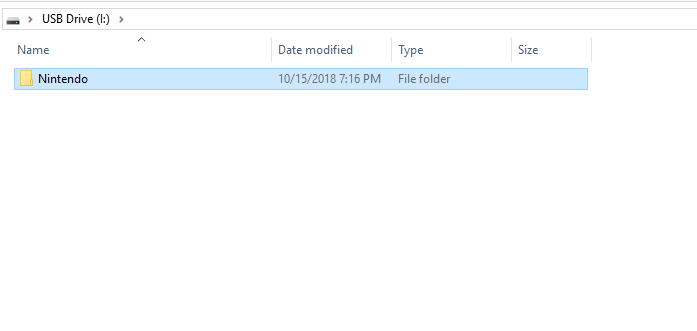
In the Nintendo folder, you’ll be able to access the Replays you recorded in Super Smash Bros Ultimate. To do this, you have to go to Nintendo/Album/Extra/[Alphanumeric Code]/. Furthermore, you’ll notice that the replays are actually organized by date. Click the folder that represents the Year, Month, and Date you recorded your replay in.
For this example, we’re going to use the replay we saved on January 22, 2019. Therefore, the file path of the replay will be represented as such:

And with that, you have accessed the replay you have been looking for! You’ll be able to extract the video file from your SD Card and once you’re done, you can put it back into your Nintendo Switch.
But What if I don’t have an SD Card?

Sadly, there’s no way for those users who don’t possess an SD card to get Replays from. However, it has been said before that Super Smash Bros Ultimate will get an App for sharing replays. On the other hand, it’s unknown if the replays will be able to be extracted from there.
Also, keep in mind that replays will be deleted everytime Smash Bros Ultimate gets a new update. The reason for this is because replays cannot transition between two different version of the game. Make sure to stay tuned at VGR for news about the latest Smash Bros patch notes.
Do you have a problem unlocking different characters in Super Smash Bros Ultimate? We have guides to unlock characters like Chrom, Isabelle, King K. Rool, Inkling, Simon & Richter Belmont, Incineroar, Daisy, and Ridley!
Did you find this guide helpful? Let us know your thoughts at the VGR Forums.